One Breath Freediving
  • Home
  • About
    • One Breath Freediving
    • Dahab Freediving
    • Frequently Asked Question's
    • AIDA International
  • Freediving & Courses
    • AIDA 1-4 Freediving Courses
    • AIDA Instructor Course
    • AIDA Monofin Course
    • AIDA Competition Safety Freediver Courses
    • AIDA Youth Courses
    • Training, Coaching, Exploring & FUN Freediving
    • AIDA First Aid & CPR Course
    • Dry Workshops
  • Booking
  • Shop
  • Blog
  • Contact

Test & Review: Sopras Apnea Freediving Lanyard

7/8/2023

0 Comments

 
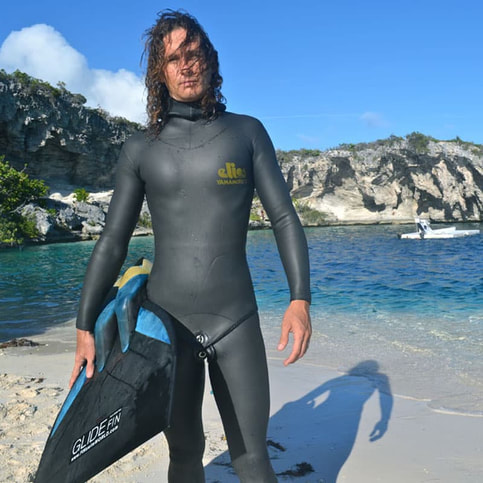
Lets start with some basics!

What is a freediving lanyard?

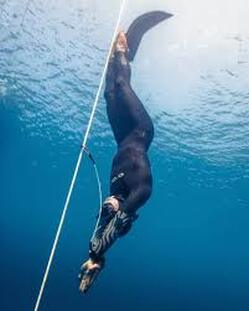
A freediving lanyard keeps the diver close to the dive line and is a safety mechanism to ensure the diver does not get lost and can be pulled up in an emergency

Why use a freediving lanyard?
For safety. It is mandatory when diving out of sight of the surface, such as deeper dives or in bad visibility conditions

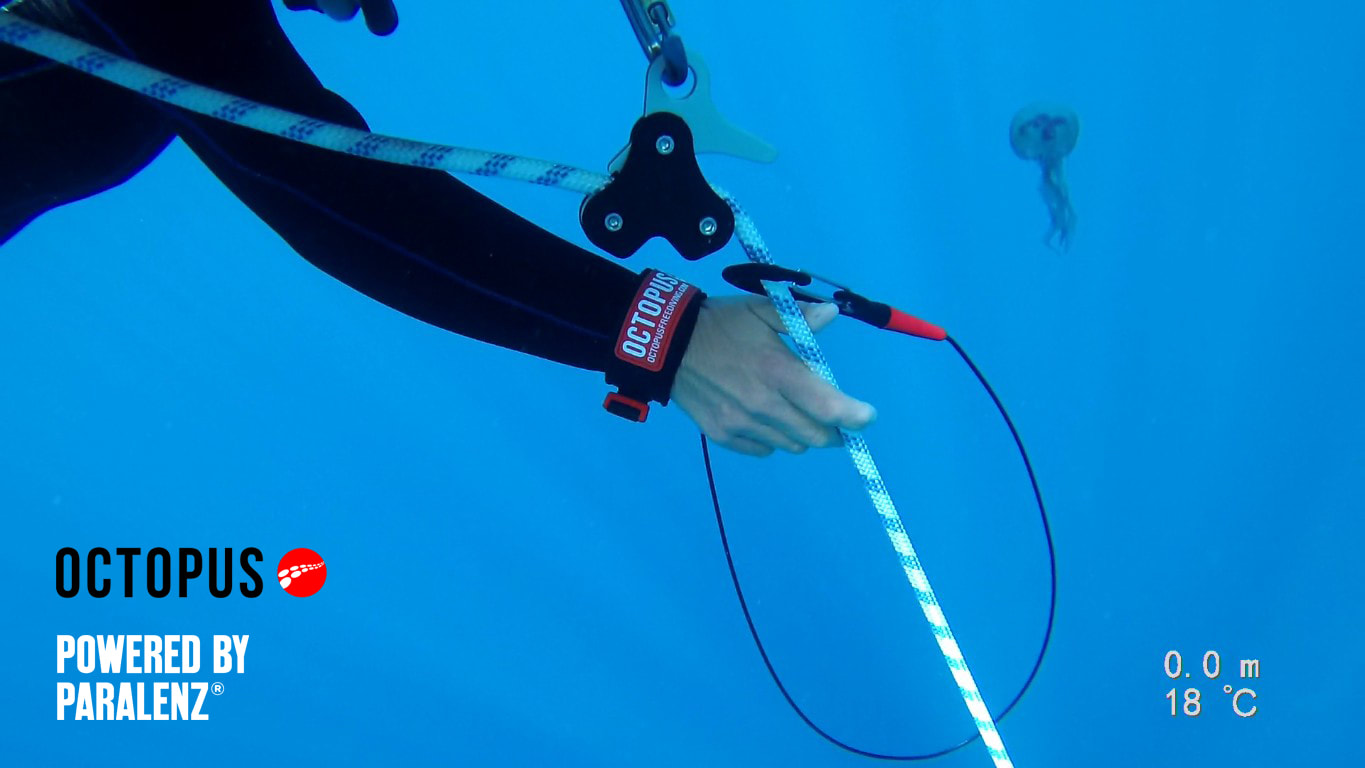
What does a lanyard consist of?
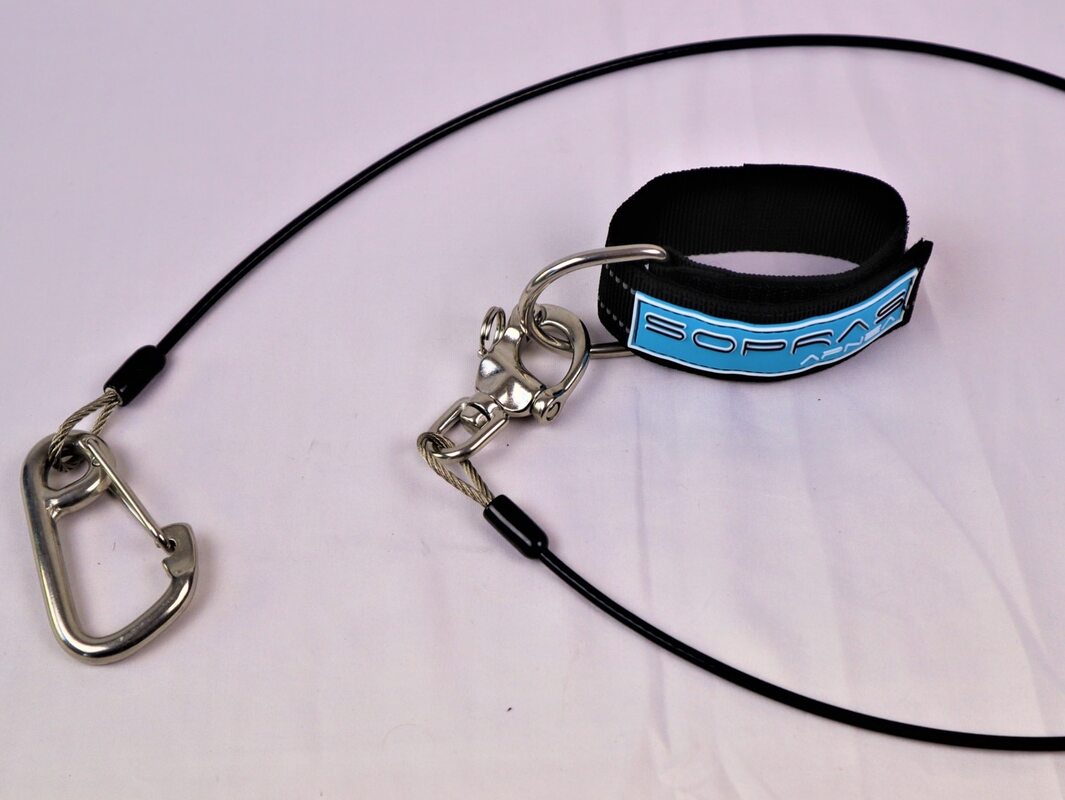
A 1m+ long cable attached to a velcro strap at one end and a carabiner at the other
There are generally 2 options with a freediving lanyard:
  1. A carabiner of steel (heavier/faster) OR aluminium/carbon (lighter/slower)
  2. Emergency quick release system of 'pull tab' on the velcro strap OR 'quick release' buckle and pull cord.​
These choices come down to personal preference

LOOKS:
The Sopras Apnea lanyard uses an effective form of cable, steel carabiner velcro wrist strap and quick release buckle. It is a simple form which is not over complicated and cluttered and leaves you to attach your own quick release pull cord of choice (OBF will include and attach this for you as we have discovered the simplest and most effective option to use).
The blue 'Sopras Apnea' logo forms the velcro strap and is in a nice baby blue colour.


IN THE WATER:
The velcro strap is big enough to easily handle in rough surface conditions and holds securely due to the large velcro contact area. The carabiner descends nicely with the diver as it is a robust steel. A nice surprise is the lack of cable twisting due to the QR swivel at the wrist strap end.

​PRICE:
At €50 it sits at a strong price point compared to some that are in the €60-65 range. The simplicity of it keeps the price down as some with carbon parts are obviously more expensive because of the materials used.
Picture
Picture
FINAL THOUGHTS:
A strong and simple lanyard that is great value for money. Perfect for use Constant Weight or Constant Weight Bi-Fins.

PROS:
  • Simple design and form keeps it simple to use and maintain
  • Great price compared to others on the market
  • Cable seems thicker and more robust than others on the market meaning it kinks less with use over time

CONS:
  • Fast moving carabiner due to being steel. It depends what lanyard you are used to and what discipline you are training as to this being an issue or not (Pro or Con)
  • Quick release pull cord must be added yourself (NOTE: when buying from OBF we do this for you at no extra cost!)
By David Watson, Owner, Founder & Head Instructor / AIDA Instructor Trainer at One Breath Freediving
0 Comments

Sopras Apnea Aperta Mask: Test & Review

27/6/2023

0 Comments

 
Sopras Apnea have released a new freediving masked named 'Aperta'. I recently took it into the water to test it out on a freediving session and here are my initial conclusions:

Looks:
A very cool looking mask with a good balance between 'angular' shapes and curves (some recent masks are very harsh in their looks). The chevrons in the silicone above the nose bridge is a nice little visual touch. From the side the profile is very low volume and minimalist with a quite pointed nose pocket.

In The Water:
It has a small and light feel to it in the hands, and on the face it feels soft and comfortable. There
 are the small waffle patters on the nose pocket that provide a better grip for pinching during equalisation. There is a degree of flexibility at the nose bridge between the glass lenses that allow some pressure at depth to be minimised through flexion of the mask structure. Visibility is great due to large lenses for such a low volume mask.

Price:
It sits in the mid to high range in the Sopras Apnea mask range, at €45, though notably I have seen the exact same mask (no doubt from the same factory), marketed by another brand and retailed at €56! So this is a real bargain.


Picture
Picture
Picture
Final Thoughts:
A lovely low volume mask at a great price. Well worth a try if you are in the market for a new or a spare freediving mask.

Pros:
- Very low volume
- Silicone skirt is soft and comfortable
- Nice looks
​- Great value
​
Cons:
- Nose pocket is on the narrow side
By David Watson, Owner, Founder & Head Instructor / AIDA Instructor Trainer at One Breath Freediving
0 Comments

Freediving Masks

26/11/2021

1 Comment

 
By David Watson, AIDA Instructor Trainer and Owner & Founder at One Breath Freediving

Hello freedivers :)
Following on from the guide to freediving wetsuits that I posted previously, I thought I would do a post regarding freediving masks and provide a few tips and tricks to help you choose wisely and get more comfortable and relaxed with a proper freediving mask. 

Here are 5 pieces of advice regarding freediving masks:

  1. Can I just use my scuba diving / snorkelling mask?: Not really. Scuba diving masks are generally bigger (internal volume), which means you have to waste more precious air on your dive equalising it. It might be good on your first freediving course but once you go past 15-20m you will notice the difference a low volume freediving mask makes during the free dive.
  2. How do I check if it fits me well?: Make sure you try a few on in a shop. I wouldn't recommend buying a mask you are not familiar with, online. You need to try a few on for comparison purposes. Hold it to your face, without the strap, and breathe in through your nose so the mask sucks to your face. It should hold there even after you stop inhaling. If it doesn't hold or feels uncomfortable then it's not the mask for you.
  3. Why are nearly all masks black?: Good question! But actually now you can get all sorts of colours such as white, pink or red. But yes, it used to be a choice between black silicone or clear silicone (the soft bit that's in contact with your face). Clear looks better in photographs but can refract the light more and does not age as well as it can discolour.
  4. Glass or plastic lenses?: Plastic lens masks are cheaper and more flexible under pressure (so can go deeper with less equalisation). They are 30-40% cheaper too, but on the down side they scratch more easily and give a different view underwater compared to glass lenses (no magnification and some distortion to the periphery vision). Normally the come on a wider fitting mask frame that curves around the face, so if you have a wider face they could be a good fit for you.
  5. How do I stop the lenses fogging up?: This is a common problem even with a high quality mask. A new mask has a coating on the lens from its production. You can buy a mask defogger spay or these following remedies work just as well if not better: Tooothpaste, rub inside the lenses and leave overnight. Baby shampoo, apply inside before diving or the night before. For both of these, wash out before putting the mask on for the dive. Use a lighter to burn away the layer inside the lenses. This is the best method but if you are not sure how to do it, ask your instructor to show you. For my current mask I needed to do the lighter trick 4 times in total but since then I get zero fogging up.

Bonus Tip: Most people I teach on the first courses pull their mask strap so tight that it leaves a mark around the face that can be seen for the rest of the day! Not only that, wearing the mask tight distorts the silicone skirt and can actually INCREASE the chance of the mask leaking and water entering. Remember, at depth we are under pressure, the mask is pushed onto the face by this pressure so it does not need our help creating extra pressure before we even start a dive.
Picture
​I hope this was helpful, let me know your thoughts on the topic!
1 Comment

Freediving Wetsuits

6/12/2020

0 Comments

 
By David Watson, AIDA Instructor Trainer and Owner & Founder at One Breath Freediving

Hello freedivers :)
I recently had a few questions regarding wetsuits for freediving so I thought I would do a blog post to share a couple of my opinions and thoughts and also to direct you to a very useful guide to choosing your first freediving wetsuit.

Here are 5 useful tips about freediving wetsuits that you might not know or have considered:
  1. A specific freediving wetsuit will be WAY better than what you used before: If you are just used to a zipped and lined scuba or surfing wetsuit a proper fitting, two-piece freediving wetsuit with integrated hood and open cell neoprene will be a revelation and you will wonder how you ever managed without.
  2. Consider custom made: It always sounds very extravagant and expensive, but if you do not fit into the normal size spectrum of S, M ,L, XL etc, it's really worth getting a customised fitting wetsuit, and it's not much more expensive (though usually with a bit of a wait time while it is made to your specifications). Better to get it right first time.
  3. Don't get too hung up on the types of neoprene: It can be confusing hearing about all the possible options available, but go back to point one.... Even the 'basic' neoprene will beat what you used before. Also, more expensive doesn't mean better for what YOU want and need. For example, the most expensive neoprene will be super stretchy but as a consequence also super fragile. I've see people tear and ruin a wetsuit like this, putting it on the first time. 
  4. Think about where you will use it: Will you be diving in the tropics or in the arctic circle? You will not get one thickness wetsuit for all occasions so don't bother trying. Again, back to point one. A freediving wetsuit will be way better (and warmer) than what you have used before. As a general guide for me: 15-22c = 5mm thickness, 23-28c = 3mm thickness.  Also it's easier to cool down in the water than warm up.
  5. Maybe it doesn't have to be black: Again, sometimes the choices can be endless. Choose thickness and neoprene type/lining first then ask about colour! Silver, red, blue, green and even orange (yes I've seen it), might all be a possibility. Or even stitching or logos in different colours might be an available option. Obviously not the most important thing, but can make you stand out from the crowd a little :)
Picture
Guide to buying your first freediving wetsuit HERE
​I hope this was helpful, let me know your thoughts on the topic!
0 Comments

Product Review: Octopus Pulling System

5/7/2019

0 Comments

 
By David Watson, AIDA & PADI Master Freediver Instructor and Owner & Founder at One Breath Freediving, based in Malta

Octopus is a company producing innovative freediving equipment, and is owned by Swiss freediver and designer, Pascal Berger. Best known for their high quality products especially the nose clips which have proved to be extremely popular, the Octopus line now includes lanyards, an equalisation tool and the newest product in the range, the pulling system.
​
The pulling system is a smart product designed to allow you to pull up or let out the freediving rope in a controlled, safe and more energy efficient manner. Made from the strongest and lightest and strongest possible materials (including aluminium and carbon fibre), the first thing you notice is the size and the quality of the material. It is significantly smaller than other similar pully systems that are now on the market, and much more compact. The ergonomic triangle shape allows one handed, handling using a ‘trigger’ hand position as you release the line. Pull the trigger and the line flows through and release to let the tension stop the rope dead. 
Picture
To pull up you can put one foot on the carbineer (that the tool is clipped on to under the buoy), lean back and pull the rope towards you in a ‘left/right’ alternate pull. The great thing here is that with every release of the tension after each pull, the weight is taken back by the locking mechanism, allowing you to take a break every so often.  This is a huge improvement on the traditional bottom weight lifting method of climbing on top of the buoy and lying face down pulling the rope up, with no chance of a break and the potential of falling off / getting tangled in the line / swallowing sea water / losing your weight belt (as you get on or off), all of which I have seen happen or experienced myself!

Post dive maintenance is minimal and it is advertised as requiring very little care: “It is so resistant that you can just leave it hanging under your buoy. No real need to rinse in fresh water.” Says the marketing, and so far this has proved absolutely true.
 
PROS:
  • Great energy saver, especially when pulling up rope from depth
  • Small and compact and ergonomic design (one handed use)
  • Very easy to adjust the depth of the rope up or down
  • Added safety for deeper divers (250kg load capacity)
  • Works with ropes 8-12mm

​CONS:
  • Can pull off the rope length markers that are electrical tape
  • Not so easy to transfer it between ropes
  • Can make for a lazy freediver! :D  

​Final Thoughts:

A great addition to a freediving buoy set up. Very easy to use and requiring little or no maintenance, it is easy to have and forget about but adds a lot to the organisation of a freediving. Overall, a great solution for much easier rope handing for freediving training and a very well designed product.
 
The Octopus Pulling System is available now at One Breath Freediving
RRP: €50
0 Comments

Paralenz Camera Pt2: In Water Testing

4/7/2018

0 Comments

 
Those of you following One Breath Freediving on your social media channels will already know that I have been using the Paralenz dive camera quite extensively already, for both photos and videos, so for this review part 2 (part 1 is un-boxing and initial impressions),I wanted to look at it's use in the water. More than numbers such as pixels and frame rates, I wanted to discuss it's functionality and how well it works specifically from a freediver's point of view. 
Picture
Firstly, it's primary mount method that I have employed so far with the Paralenz dive camera has been the mask mount. For me this has been the most convenient as I am normallly using it while teaching or guiding. Once the mask attachment is threaded to the mask strap, you clip the camera on using the 'T-Rail' mount system that gives a reassuring double 'click' when properly secured.

The first thing you notice while wearing it in the water is.....that you don't actually notice the camera! Despite feeling substantial and solid when held in the hand, once attached to the mask I can honestly say that I forget that the camera is actually there. Being so non-intrusive is a huge plus for freedivers as we take in the water minimum equipment and definitely don't like things that create drag or resistance.

Functionality from this position is another massive plus. The feedback loop of vibrations of the camera unit, mean that you do not need to remove the camera (and mask) at all to know what setting you are in! For example, rotate the selector ring clockwise while turned on gives one vibration for video, two vibrations for camera, three for settings etc. And then long or short holds of the activation switch can start or stop recording or offer other functions. This creates a simple user and selector operating system and excellent hands free usability.
Picture
Now lets look at the quality of photos that Paralenz is capable of (for videos, check the OBF YouTube channel). All the snaps in this review were taken from the mask mount position, so just a reach to the side of the head and a short pull on the activation switch can give you some great photos. While primarily a video camera, the photos are surprisingly clear, sharp and lacking in distortion at the edges (as can be common for extremely wide angle cameras). In these photos I had Depth Colour Correction (DCC) turned on and Depth & Temperature overlay turned on. The photo above from 5m displays nice blue water and clear white logos on the wetsuit hood. The first photo handles the reflecting light from the shallow water very well and also created a shot that is not blurred or distorted from the divers movement.
Picture
Initial in water conclusions:
  • Mask mount is very useful for hands free use
  • Unit vibration feedback is a great idea and super useful with mask mount 
  • Photos lack distortion and are very sharp
  • DCC is perfect for multiple depth change diving (such as freediving)
Look out for part three of the test where I will review the features of the Paralenz App.
0 Comments

Paralenz Camera: Pt.1 Unboxing & First Test

18/5/2018

0 Comments

 
I recently got my hands on the new Paralenz underwater camera. This powerful little package has been making waves (excuse the pun) in the underwater world. An action camera specifically designed for underwater use it has some really well thought out features and specifications.
​But I am getting ahead of myself! Let me start with the un-boxing.

The whole package of the Paralenz camera tells you it is well thought out and made for divers, by divers. Firstly, you can't help but be impressed by the included carry case that securely seats the camera and accessories, keeping them safely in one place for travel. This would always be an extra purchase with any other make of action camera. Secondly, inspecting the actual camera, it is shaped like a dive torch having a sturdy and substantial feel to it, feeling robust and of high quality  (it is made from aluminium). It also has a weight to it that gives it a great feel in the hand. 
Picture
Picture
Testing out the buttons and dials it has two main options. The selector ring (blue dial) is magnetic and allows you to select the main options (video, photo, settings etc) and the activation switch (raised, before the logo) allows you to select options and start/stop recording. Both have a smooth and distinct movement when used. ​In conclusion, the build quality is top notch.
At the rear of the camera, behind a glass window, is a small screen  that shows the current mode and battery / SD card usage as well as the charging port for the USB-C cable.​ This will be the most notable difference from other action cameras..... The absence of a screen for viewing video. But what would a big screen be used for? To centre the picture during filming maybe? But the field of view in this camera is so wide anyway, and with experience you will get to become a good judge of distance and framing. In the real world, large screens on action cameras were a battery draining luxury (who actually played back footage direct on their camera???)
The accessories included here set the standards high once again: two different mounts, grease, spare o-rings, case, lanyard.... All would be extras by other manufacturers. It tells you this camera has been thought about and the end user considered.
Picture
Picture
The camera uses a wi-fi link to a dedicated app. This is something new for me and as not the most technologically minded individual I was not sure how easy I would find it, but it was actually very intuitive. Once the connection was found I could quickly view and save my first underwater footage from the camera! (pond life, 10cm underwater, but hey, we have to start somewhere, right?!)
So what initial conclusions do I have:
  • Great package, well designed and feels very high quality
  • Nice extras included
  • Easy and intuitive to use
Very much looking forward to testing it in the sea! Coming soon will be part 2 of the test when I will use it for the first time freediving in the Mediterranean sea, Malta, and going in to more detail about the settings and underwater performance and hopefully have some nice footage to show off :)
0 Comments

Review: Subgear steel comp mask pt.1

4/9/2015

1 Comment

 
Welcome to our review of the Subgear 'Steel Comp' freediving mask. This mask has some innovative features and has been making waves in the world of freediving, so we put it to the test. Here is part one:
Picture
Part one: Out of the Box
The first thing that notice when handling this mask is just how soft and flexible it is. The 'skirt' is very thin and pliable and the mask can actually be bent in half! This is to allow for compression at depth and so to prevent excessive need to equalise the mask. Those of you familiar with the popular Aquasphere 'Sphera' mask, will understand what advantages this allows (depths of 20m without mask equalisation). However, unlike the Sphera, the Steel Comp has flat glass lenses as opposed to curved plastic lenses, meaning some visual distortion will only occur under greater pressure (i.e: deeper).
Other innovative features of this mask, include: Ridging on the silicone of the nose to provide better grip for equalisation. And extremely ergonomic mask strap attachment featuring an easy clip release button to completely free the strap from the mask, and very easy strap adjustment pull tabs (making it easier to adjust the strap while it is on the face.

The shape and fit to the face is very similar to the Technisub 'Micromask' (which is my current mask of choice). Comparing the field of vision on land these two seem about equal, if not the Steel Comp giving a slightly greater angle.

For those of you more fashion conscious the Steel Comp is also available in all white or all clear.

First impressions are extremely positive and I'm looking forward to taking it into the water!

Part two of the review coming soon......

Available NOW: €45
[email protected]
1 Comment

    Author

    Find out what One Breath Freediving is up to with the latest posts on this blog page.

    Categories

    All
    AIDA International
    Art
    Article
    Congratulations
    Dahab
    Education
    Equipment
    Freediving Competition
    Freediving Course
    Freediving Exploring
    Freediving Training
    Fun Freediving
    Health
    Malta
    Marine Life
    News
    Open Water Freediving
    Photograph
    Pool Freediving
    Quote
    Review / Test
    Safety
    Science
    Tips
    UK
    Video

Proudly powered by Weebly